
Showing posts with label recipes. Show all posts

Friday, July 9, 2010

Zucchini Bread

I've gotten several requests for this recipe over the last couple of days, so I thought I would share!

This recipe is super special to me, because it is the recipe my Grandmother always used. I follow it exactly--it's never as good as hers was, but it is still the best I've ever tasted. Each time I chomp into a piece, I always think of Grandma Franzi.

Now, for our family, I double the recipe, then double it again to make eight loaves. I bake it all at once, and I've never had any problems. For me, it is a big time and energy saver to do it this way. Two loaves at a time and I would be baking all day long! I have gotten to where I no longer even glance at the recipe, and I can have eight loaves prepared, in the pans, and baking in under 20 minutes.


I've baked a lot of bread!

After baking, I cool the loaves in the pan for a few minutes, then remove and cool the rest of the way on baking racks. Once completely cool, I wrap the bread in one layer of heavy-duty foil, then one layer of Press-n-Seal, then package two loaves into a good gallon-sized freezer baggie. They keep all winter, and taste almost as good as they do when they are fresh out of the oven.


{don't mind the date on the baggie--I reuse them!}


3 C. flour
1 tsp. baking soda
1/2 tsp. salt
1/2 tsp. baking powder
1 Tbsp. cinnamon
dash nutmeg
1 Tbsp. good vanilla
3 eggs (large)
1 C. oil (I use canola)
2 C. sugar
2 C. grated, unpeeled zucchini
1 C. chopped walnuts

Preheat oven to 325. (Okay--here is one deviation of mine from Grandma: I bake mine at 350. I don't know if it is my oven, or the fact that I am baking so many loaves at once, but mine were never done in the middle at 325, but were getting hard on the edges. I do 350 for one hour, five minutes.)

Grease two loaf pans.

This is a very important step. If you don't follow it, you will get done baking, and then this will happen:
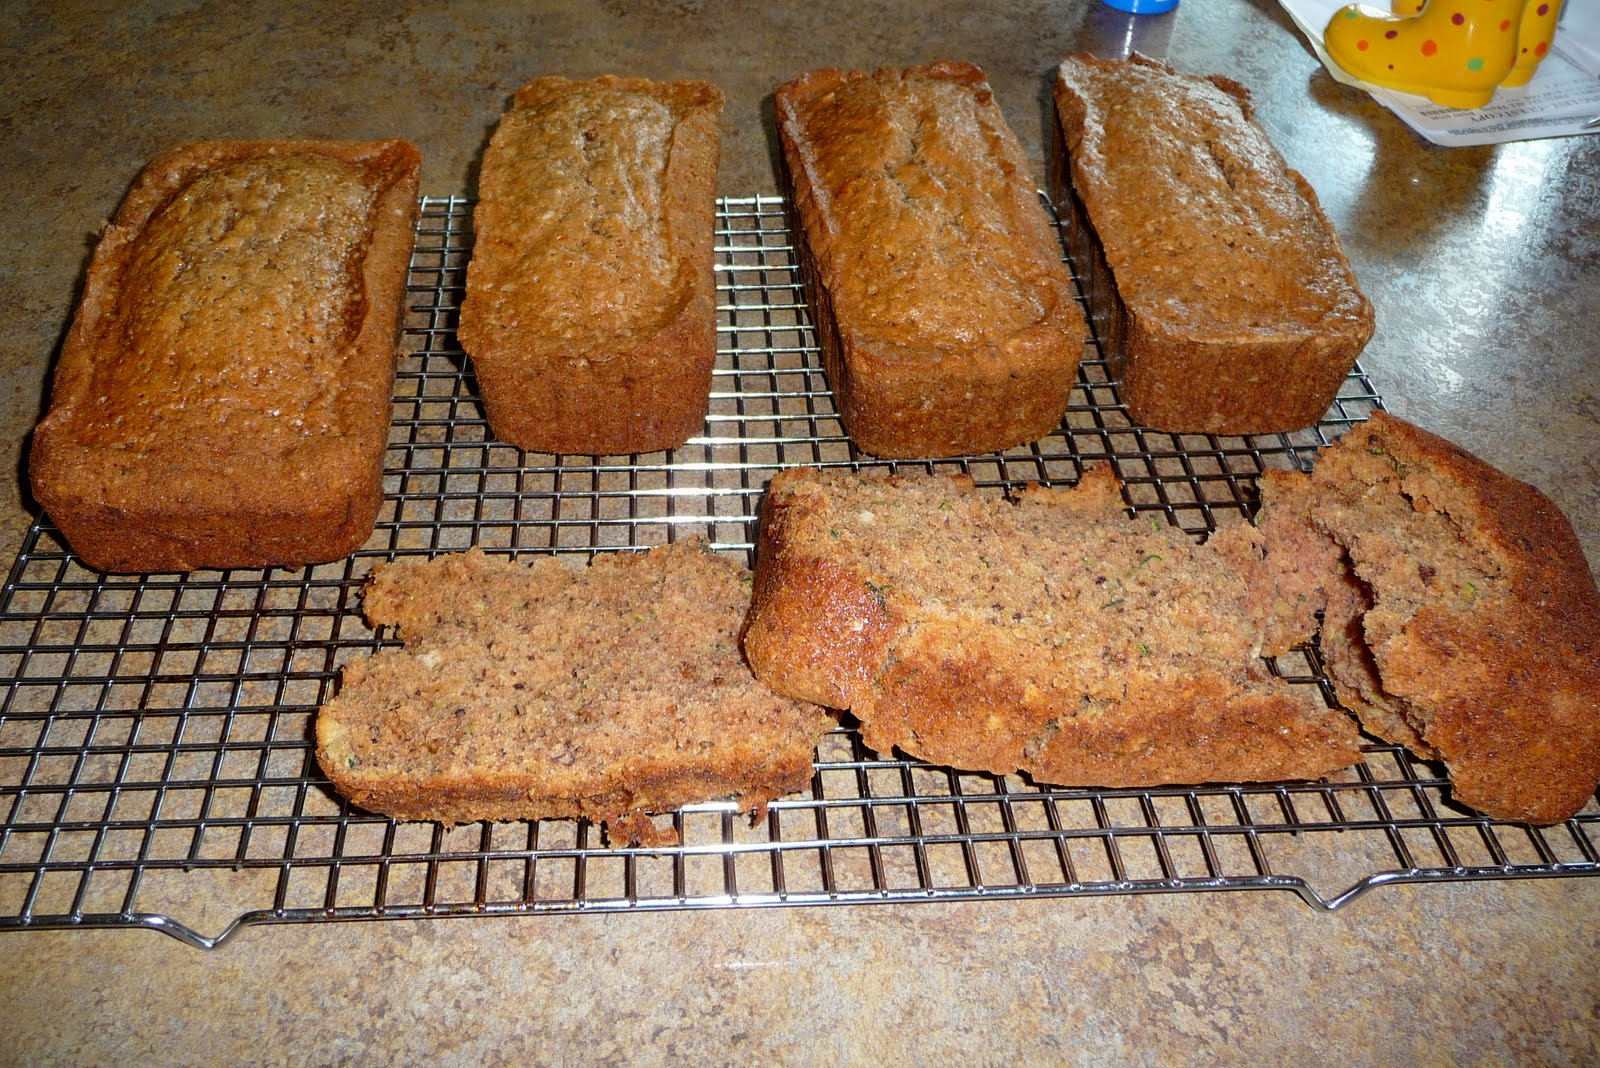


Then you will cry over your failed loaf.

Then you will rethink the situation, dry your tears, and rejoice instead--because now you get to eat this loaf instead of having to freeze it. {Or maybe that's just me choosing to find the brighter side?}

In a large bowl, sift together the flour, baking soda, salt, baking powder, cinnamon, and nutmeg. In a seperate bowl or Kitchen Aid if you have it, beat eggs; add oil; then sugar and vanilla. Add zucchini and nuts. Add dry ingredients slowly. Mix well. Divide evenly between your two loaf pans. Bake for about one hour and 10 minutes, being careful not to over bake. A toothpick inserted into the center should come out clean.

Let me know if you try it and like it! I would also love to hear your bread recipe, if it differs from mine.

Lastly--I have zucchini coming out of my ears....besides breading and pan frying, what else do you do with it?

Have a great Friday everyone!


Thursday, September 24, 2009

Things I love Thursday: Red Hot Applesauce

I mentioned on Facebook this morning that I was going to spend some time today making one of my favorite Fall things: Red Hot Applesauce.

Then, I read this post over at the Diaper Diaries, and thought, "Hmmmm....I could share with everyone my love of Red Hot Applesauce, and gain an extra entry to win a Halo Sleepsack . . . . suh-weet!"

So, here I am, sharing with you something I truly love for Things I love Thursday. (If you'd like to join the carnival or enter the contest as well, just head on over to the Diaper Diaries yourself!)

Let me just say: I look forward to making this all year. It's that delicious.

The great thing, too, is that the recipe could not be any simpler. The hardest part, truly, is peeling, coring, and slicing all of the apples--but I picked up this handy tool at a garage sale last summer, and it has made cooking 'all things apple' infinitely easier! I got the stand and the corer for $5, which is an incredible deal. After using it again today, I would say if you are an 'all things apple' lover like I am and make things like applesauce, apple pies, or apple butter every year, this product is worth the full-price investment.

"If you have the means, I highly recommend picking one up."

Name that movie.

Sorry. I digress.

Anyway, the recipe.

By the way, I am not much for measurements when I cook.

I'm more of a "fly by the seat of my pants kinda gal, you know, moment to moment....that's me....that's....yeah."

Sorry. I did it again. Geesh.

Anyway, I'll give you my best guess approximates on these amounts.

You will need:

  • Apples. I have always used Golden Delicious for this recipe.
  • Red Hot Candies. I buy the large, 2.75 pound bag. It makes a few batches of applesauce.
  • possibly sugar
  • possibly water

I say 'possibly' because I have never used either of those things--my apples have never stuck to my pot (that's what you would need the water for--to keep them from sticking on the bottom) and with the Red Hots, the applesauce has never had the need for additional sugar. But everyone has different preferences of sweetness, and not everyone uses non-stick cookware, so have both of those on hand when you make this.

Peel, core, and thinly slice your apples. I simply use as many apples as I can possibly fit into my 7-quart pot. It will cook way down. Cook your apples over medium-low heat with the lid on for awhile, stirring every few minutes. They should start to soften up after about 30 minutes, but won't completely break down for at least an hour or so. Stir the pot often, and you will begin to notice that, as you are stirring, the apples are already turning into a 'mush' consistency.

Mush. Mmmmmmmm. Doesn't that sound yummy?

Once the apples have started to break down, add your Red Hots. I add about two handfuls to start, and go from there. Stir them in. The heat will begin to break them down as well, and they will add a beautiful red color to your sauce!

Let these cook a little while, until you aren't seeing too many large chunks of apple any longer. Once all the Red Hot pieces and most of the apple chunks are gone, I take a regular ol' potato masher--fancy, I'm aware, but it works--and mash all the remaining lumps that I can find.

Some would say that you need to press the apple mixture through a food mill or a sieve to get the 'proper' applesauce consistency. I say, a little lump here and there never hurt anyone, and I don't have the time nor the patience to push things through sieves when I cook. Ahem.

Now, it's time for the best part.

The taste test.

If the sauce is not sweet or 'cinnamon-y' enough for you, simply add more Red Hots! (This is why I would caution you to go with less, rather than more, at first--you can always add, but you can never take away!)

If you'd like, you can can the applesauce right then and there. Process for 20 minutes (following all instructions for canning that are found in this book) in a boiling water canner.

I'm finding that, after my first batch today, it's looking like I'm going to need another batch if I want to can this stuff. Between me, Cameron, and Ethan, we've had seven helpings--yes, seven, and I was only responsible for TWO of them, thankyouverymuch--since around 11:30 this morning. After hubby and Colin get home, I'm fairly certain there won't be enough left to can.

Note to self: Go back to the orchard for more apples and more Red Hots.

Hope you enjoy the recipe! Let me know if you try it and love it as much as we do!


Tuesday, March 31, 2009

Sun-Dried Tomato Rigatoni with Sausage Meatballs


We had this dish for supper last night.


I seriously would consider this one a guaranteed winner.


This recipe (which I have modified a bit, but originally came from the Kraft Magazine) has become one of my very favorites--it is unbelievably simple (and quick) to make, and everyone in my household gulps it down as if they haven't eaten in days, which thrills me to death.


In the interest of you 'menu-planning' mommas out there--and for Julie, who wants so badly to try, I just know it--I thought I would share!


Sun-Dried Tomato Rigatoni with Sausage Meatballs


  • 1 pkg. sweet turkey sausage (link-style; these actually look like bratwurst and come five in a package. They'll be in the turkey section of the meat department)
  • 1 6-oz. can tomato paste
  • 1/4 to 1/2 cup Kraft Sun-Dried Tomato salad dressing
  • 1 box Rigatoni
  • salt for pasta water
  • onion powder and garlic powder, to taste
  • pasta water, reserved

Begin by bringing a pot of water to a boil.

Heat another large skillet over medium heat.

Take two of the links out of their casing and make them into tiny meatballs. {I like to make mine very small, like about the diameter of a dime or less. They cook quicker; I find that the boys do better chewing them; and there are more to go around in every bite of pasta! You might want to use more meat, though, depending on your family's liking.}

Brown your sausage meatballs on medium heat in your large skillet. You will be adding the rigatoni into this pan later, so make sure you have enough room for all of it in your pan.

When sausage is browned, add the can of tomato paste and your dressing, and combine it all. I like my sauce to be a bit on the thinner side, so I use the full 1/2 cup. Don't go too crazy thinning out your sauce with the dressing, though--that is what the reserved pasta water is for later on!

Season with garlic powder and onion powder to taste. I rarely measure anything, but I think I use about 1/2 teaspoon each.

Turn heat to low, and cover your meat/sauce mixture. Use foil if your large pan doesn't have a lid; it works just as well!

Add a good amount of salt to flavor your now boiling pasta water, then give it a stir. Next, add your entire box of rigatoni.

{Go ahead. Make the whole box. I can almost guarantee that this will be so well liked that the leftovers--if there are any--will be quickly eaten up!}

Cook the rigatoni to al dente, about 10 minutes. Do NOT overcook the pasta!

Turn off boiling water, but do not drain pasta. Using a slotted spoon, add your rigatoni to your sauce/meat mixture. Don't sweat it if some of the water is getting in the sauce, 'cause you need some of it in there anyway!

Once all the pasta is added to the sauce, check your consistency. There isn't going to be a lot of sauce leftover--this isn't a recipe like that. Basically, you should have just enough sauce to completely cover all the rigatoni. If the mixture seems too pasty or thick, simply add more pasta water until it gets to be the consistency you prefer.

Serve with garlic bread and a salad....yummy!!!


Oh, yeah. If you do try it, be sure to let me know how you/your family liked it!


Saturday, January 10, 2009

Kids Can Cook--Overnight French Toast Edition

This morning, we ate the best French Toast I have ever eaten in my entire life.

I mentioned in this post how I have begun to bring the boys with me into the kitchen to cook, and how much they have been enjoying it.

So, during this week's trip to the library, we checked out a couple of books from this series of children's cookbooks and last night, took a crack at the first one: Overnight French Toast.

Ever since we checked out the book, Colin has been excited at the prospect of "makin' stuff". He sat down with the book right away when we came home, and identified the tools we would need. He asked me about ingredients--what they were and how they worked in the food we were going to make. I had him go through the book and look at the pictures, and pick out one recipe that he thought he would really like to do.

He picked out three.

I could not get him to consolidate.

So, we made a grocery list that included the ingredients for all three.

Who am I to stifle a boy who wants to cook?

The first one we started with was this Toast. The recipe was very easy, with regular ingredients and simple instructions that children can do. Colin did several of the steps (including slicing the baguette. Well--I helped him a little with that one. I'm not just gonna unleash him with a 10'' long bread knife, despite how responsible he may claim to be.....) and he really seemed to like doing it.

The best part? Eating it this morning.

It. Was. Delish.

I would certainly call it the best French Toast 'we' have ever made. We all loved it. This recipe will be one I will definitely make again--and soon!

For me, there were a couple of great things about this particular French Toast:

1. I loved that the recipe called for a whole baguette rather that plain slices of store bought bread--that translates to very fresh bread (which you can get at just about any supermarket nowadays) and also bread that you can slice as thick or as thin as you like your Toast to be. We like it on the thicker side around here (and, as an afterthought, I do believe that thicker bread worked well with this particular recipe, since it soaks overnight.)

2. You heavily coat sprinkle the Toast with a mix of cinnamon and sugar before baking it. If you don't understand why I think that is a wonderful thing....well....I don't think I can help ya.

3. For me, the best part was that the toast was cooked in the oven, rather than on the stove top. I don't know about everyone else, but making enough pieces of French Toast for everyone in our family usually involves several batches. Cold food is the bane of my existence, and generally, no matter what I do (short of putting it in the oven to keep warm, which *ugh* dries it out), the first batch is cold by the time the last one is done. Also, instead of standing over it and making sure I didn't burn it babysitting the Toast while it cooked, I was actually able to do a few other things--like scrambled eggs, hash browns, and cappuccinos. Mmmmmmmm.

Lesson learned: Make this more on Friday nights!!

Overnight French Toast
  • 1 French loaf of bread or baguette (a loaf will be thicker and shorter; baguette longer and very skinny--either can work)
  • 4 large eggs
  • 2/3 cup whole milk (I used 1%)
  • 1/4 tsp. salt
  • butter at room temperature, for greasing
  • 4 tsp. sugar
  • 1/4 tsp. cinnamon
  1. Use a serrated knife to cut the bread into 3/4 inch slices. Set the bread on a baking sheet to dry out for an hour or two.
  2. Put the bread slices in a 9x13 pan, fitting in as many as you can.
  3. Whisk the eggs, milk, and salt together. Pour the mixture evenly over the bread. After 10 minutes, turn each piece of bread over. Cover the pan with plastic wrap and refrigerate overnight.
  4. In the morning, remove pan and preheat oven to 450 degrees. Grease your baking sheet.
  5. Put the bread slices wet side up on the baking sheet.
  6. Mix the cinnamon and the sugar; sprinkle *grin* the mixture over the bread slices.
  7. Bake for about 15 minutes, until golden on the top.
  8. Garnish with Maple syrup, powdered sugar, or fresh fruit.