Showing posts with label How To. Show all posts

Wednesday, April 18, 2012

Homemade Laundry Soap: Part TWO

A few of you had some questions about my homemade laundry soap, and I wanted to address them in case anyone wanted to try to make a batch yourself.  So, here goes!

Carolyn said:

  • Clothes come out smelling clean? It gets out the boy grime? Do you use fabric softener with it or just this in your machine?
Yes! My clothes do come out clean and smelling great--although I do use a Bounce dryer bar, and I'm fairly certain that is where the smell comes from, because the detergent itself doesn't have much of a smell. (I love those bars, by the way--I dry everything on a low heat setting, and I feel like they last forever!) Remember, however, that I do pre-treat the major grime/stains/grass stains by wetting the stain, rubbing it with a bar of the Fels Naptha soap, and working it into the fabric a bit before washing. I found that to be necessary when dealing with little boy/man grime.

Also--a friend of mine uses this same recipe, but uses a bar of IVORY soap because she likes the way it makes the detergent smell. She says it works just as well!
  • What about this - if I don't want to store so much of it - what if I just half the recipe?? Shouldn't be a problem, right?! I am just thinking it is easier to store half a bar of soap than all that concentrate.
You are absolutely right--I see no reason at all why you couldn't HALF or even QUARTER the recipe! What a great way to try it out before making a huge batch!
  • Could I store the "ready to use" portion in the now nearly empty liquid laundry Tide or Gain soap dispenser? (i.e. the ready to use stuff is liquid-ey enough to come out of the nozzle?)

You absolutely can store it in an old bottle. Any plastic bottle that you can pour from will work just fine!  (Oh, and Care? Lola most certainly did get her cheese!!)

MaryAnn said:

  • I made a batch of the powdered version. I think it works really well on everything except my husband's work clothes. They just smell like his workplace and not much of anything can get that out. My question with the liquid version is how do you get the concentrate out of that five gallon bucket poured into the empty jugs? I'm pretty sure I would make a HUGE mess so maybe you have a method?
MaryAnn--two things. 

I will admit that my husband's work clothes are yucky too--and this detergent doesn't get that yuckiness out. However, in all fairness, neither did Cheer or Wisk. You are right: there are sometimes just smells (my husband is a carpenter and there is a distinct burnt metal smell that gets on his clothes when he is dealing with those materials at work--it does not come out no matter what I do, and I am open to suggestions on this post if anyone has an idea!) that won't come out of there, and this is one of them.

My philosophy on this, honestly, is that I know the clothes are coming out clean, even if they don't smell as fresh as I would like them too. (Nothing, not even the expensive store brands, made them smell the way I hoped they would!) The dryer bar helps--and truthfully, knowing he is just wearing them back to work to ingrain that same smell in them again makes me not worry all that much about it. I keep his clothes separate, and wash them in a separate load. Sometimes, that's just all you can do!

As for the second part of your question, I just use a regular ol' Pyrex glass measuring cup (a 4-cup) and dump it in the bucket to fill it, then pour it in the mouth of the jug. Very easy, and nowhere near the mess you were probably envisioning!

On Facebook, I had a few more questions:

  • Where did you get the ingredients at?
You can find them all, most likely, at your local grocery store. Our local Walmart also carries them.

  • Can it be used in HE washers?
Yes. My washer is an HE. The detergent does not create suds in the washer, so it is safe for both regular and HE.

  • How long have you used it, Devin? Does it really get your whites white? That is the one complaint I've heard from a friend who made her own.
I have used this detergent for over two years now. I will be honest; I have a technique with my whites to keep them as white as I can. I put a scoop of Oxyclean in the washer and turn it to the hottest wash. I let the clothes wash for about 10 minutes, and then stop the washer and let the clothes sit and soak in the Oxy/detergent mixture overnight. Then, in the morning, I start my cycle up and let the clothes finish washing. I think my white look great!

To be fair, I would like to say that I have always done this technique--even when using the store bought detergent. This is just how I "do" my whites (since I stopped using bleach long ago); I don't do it just because of this detergent.

I hope this helps, and answers some of the questions that are out there regarding laundry soap making.   Make sure you let me know if you make a batch--I hope you love it!!


Tuesday, April 10, 2012

Homemade Laundry Soap

Last week, I showed you this picture and told you that Lola and I made something....did anyone have a guess as to what it was?


You would probably only know if you had done this yourself before, but we made our own homemade laundry soap!

Before you think I am a wacko, you must know two things:
1. This stuff is easy to make.
2. This stuff works well.
3. This stuff is cheap!!


I had read about this before, and a couple of years ago, I decided to buy the stuff and go for it.

For this recipe, you need:
A five gallon bucket
1 bar Fels-Naptha soap

And Borax and Arm & Hammer washing soda--not baking soda.

Start by "grating" the soap. I am too lazy to do this, so I just use a knife to shave it in 
really thin strips. Works just as well.

Add your soap to a pot of 4 cups of hot water, and continue to cook/stir until the soap is all melted.

Try to convince your daughter that the soap is not cheese, and no, she can not have a bite. 
This may be more difficult as she insists on having cheese and the crying just gets louder.
You may or may not have to actually get out some real cheese and give it to her, so that she stops.

This is what it looks like when the soap is starting to melt. This process usually takes five to 10 minutes, 
depending on how small you were able to grate or chop your soap. The smaller, the better, 
because there will definitely be less melting time involved.

While your soap was cooking, prepare your other two ingredients in your five gallon bucket. 
You will need 1/2 cup of Borax, and 1 cup of the Washing Soda.
I also begin filling up my (saved) milk jugs with hot water from the tap at this time.
You will see about that in just a minute.

Soap is fully ready now. Time to dump in the bucket.

Once the soap is dumped, stir to incorporate everything together. The mix will get very, very thick.


This is where you will add your hot water--add it all the way to the top of the bucket. 
It will be just short of five whole gallons. Little helpers make the process much more enjoyable!


All done and filled to the brim!

Yay!


Now, all that is left is to cover your bucket. I was cheap and didn't buy an actual cover for mine, 
so I just went the redneck route and used Press N Seal. Hey, it worked great! lol

You will let this mixture sit overnight. When you come back in the morning, 
you will find a gelatinous mixture in the place where you left your runny soap!

You can see how it is almost in one piece. I could pull it off of the side with my wooden spoon.

This shot gives you a good idea what the soap should be the next day. (Excuse the weird red claw.)
Now you need to get all those big lumps out. Stir stir stir, baby! I actually gave up on the wooden 
spoon and used my hand to squish all the hunks up. I won't admit that it felt kind of cool and that 
I felt like I was a kid again getting into the mud or something and that this was a strangely fun task. 

Now here is where my method may differ from what you have seen/read. I do not, at this point, add five MORE gallons of water (which is what you are supposed to do). Instead of storing 10 milk jugs full of the completed mixture, I just store the concentrate.

I pour all of my concentrate from the bucket into five milk jugs (I just save them and keep using them!) and mark them 'concentrate'. Then, I have ONE jug marked 'ready to use'. As that jug gets lower, I mix four cups of the concentrate with four cups of water, and put it in the ready to use container. This eliminates the need for storing 10 gallons of laundry soap--now I am only storing five, and making the ready to use stuff as needed.

I store them all on my top shelf in the laundry room. 
They are out of the way, but accessible as needed.

This process really is easy, and really gets our clothes/towels/bedding clean! I have found that for tougher stains, I keep an extra bar of the Fels-Naptha on hand to pre-treat.  The tough stains do come out better that way.

A couple of tips:

  1. You will want to gently shake your ready-to-use mixture before you use it each time. Helps just in case the soap inside started to gel again.
  2. You probably won't need laundry soap again for at least a year. This is my second batch, and I did my first one over two years ago! Crazy, huh!
  3. You don't use very much. I use about 1/2 cup at most, even for my largest loads. Less for smaller.
  4. This is HE safe. I myself have an HE washer. It will not suds up in your washer.
  5. I paid $1 for the soap, and about $3 each for the Borax/Washing soda. I still have tons of the Borax and Washing Soda left, even after two batches. So this recipe, I would say, probably cost me a grand total of less than $2 to make (for 10 gallons!!), when you take it over time. You will need to spring for the $1 soap each time you make it! lol


Any other questions you can think of? Do you make your own soap, and have you liked it as much as I have?

Thursday, August 26, 2010

Tomato puree

Before I start giving any 'advice' on what I do or how I do it, please let me say:

I am no Ree (though, in my daydreams, she tells me what a good little cook I am and how proud she is of me). My pictures are, in comparison to hers, terrible--but I have a point-and-shoot as compared to her Nikon, and I don't know much about photography (though I badly want to learn--yeah, in my spare time....). So I figure I'm slightly off the hook in the photo department! I did the best I could with what I have and what I know. And I'm pretty sure you'll get the gist. *grin*

These are my methods, from trial and error over the last few years. I am certain they can probably be improved on, so please, if you have some tips, share them in the comments! I know that I would appreciate that.

But try to be gentle with criticizing or you might make me cry. And then I may never do another post like this again.

And that would make me sad.

So, let's jump right in, shall we?

My garden has provided me with a wonderful crop of tomatoes this year, and we're not done! Did you know that in many places, tomatoes will continue to bloom and grow until the first frost? We have at least another month here before that happens, so I am hoping to get a few more batches in before all is said and done!

The pictures below are from my fourth batch of sauce that I just did two days ago. Here we go!


Get'cha a big ol' pile of tomatoes.

For beginners that do not have any 'equipment', you will need to set up a large pot with boiling water and another bowl filled with ice water. Place your tomatoes, a few at a time, in the boiling water for about 30-60 seconds, then place immediately in the ice water for just as long. Pull them out of the ice water, and slip the skin right off. Now, cut the core out of your tomatoes, quarter them, and put them in a large stock pot on the stove to begin cooking down. You will need to puree them (either with a food processor or a blender) in small batches and then strain out the seeds to get your puree.

Now, my method varies completely because of the equipment I have.


I wash my tomatoes, and then halve them....

....and then quarter all of them. I don't worry about removing stems or anything!

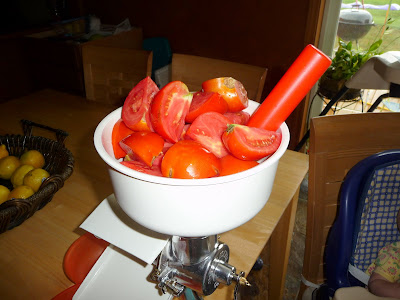
Here is why I can do that, and why my sauce making process is so easy: I have a wonderful invention (new to me this year and it was worth every dime I spent on it) called a food mill.

If you don't have one of these, you can obviously still make sauce, but it will just take you longer. This beautiful creation does most of the work of this process for me (like creating the peach puree I needed for my spiced peach butter!) and requires very little effort on my part.
I dump a big bowl of quartered tomatoes in....
....and start cranking.
It does it's magic, and within seconds, tomato puree begins dripping out.
A little at first....

....and then lots and lots!

It was at this point during my *cranking* that I noticed a hummingbird invading my herb garden, right outside of my sliding glass door--about five feet from where I was standing.
He struck a great pose and insisted on a picture. I obliged.
Where were we?

Oh, yes. The tomatoey goodness coming out of the food mill.

What's great is that all of the junk that you don't want in your sauce--your skin and your seeds--comes right out of the side, right into a handy-dandy garbage bowl!


Oooh, a red-throated one.
Neat.
He's a brave little sucker. I'm pretty close.

*Must. Focus.*

The bowl of red deliciousness fills up, and then I transfer it....

....to a mac daddy stockpot. Mine is 18 quarts.
Make sure you use stainless steel and not aluminum to avoid a bad reaction.

Hey cool! Now there is a yellow finch on the feeder too!

Ahem
.

I continue transferring the sauce from my bowl to the pot, little....
....by little...

....and by the time I am done with my pile o' tomatoes, this is usually what I end up with!
A whole pot full!


Tomorrow {hopefully} we'll take this puree and make some sauce!!

Let the tomato preparation tip sharing begin....